|
1-cell embryo transfer is best performed after allowing injected embryos a little recovery time in culture. This allows better evaluation of the cells' survival - those that have been damaged during the injection process will undergo cytoplasmic condensation, causing the cellular material to become less glossy and darker in color as the cytoplasm shrinks away from the zona pellucida. This should be balanced against the increased survival rate with decreased in vitro exposure. The Recipient Careful selection of the recipient is most important as the pups are the end result of a lot of hard work. I personally use Swiss Webster mice, as they are quiet and make excellent mothers, although do become overweight quickly and exhibit bad planes of anesthesia when heavy. This is also a very inexpensive mouse to use. As an alternate, another strain I have used with considerable success is B6D2F1. These mice are hardy and display hybrid vigor. The Equipment For surgery, I clean (with 70% alcohol) the following (all Roboz instruments): 5 pairs of forceps Autoclip metal wound clipper 1 serafin clip 1 mouth pipetter and hand-pulled transfer pipette The Anesthetic Avertin (2,2,2 tribromoethanol) is found to be quite effective. For method of preparation, see "Manipulating the Mouse Embryo", CSHL Press, ISBN 0-87969-384-3. Store wrapped in tin foil at 4oC as this reagent is light sensitive. Test after making a new batch. Shake well before use. The Transfer Select a mouse that has been plugged by a vasectomized male where the plug has been visualized in the early morning of the injection day. Do not use an mouse that appears lighter than 25g, as underweight mice tend to re-absorb the embryos as they are not physically ready to support a pregnancy. Overweight mice can make surgery difficult by the absorption of anaesthetic into the fat reducing the potency of the anesthetic; also, the presence of fat means the presence of blood vessels, and cutting through all the extra fat causes a lot of unnecessary bleeding. This makes it difficult to see what you are doing and may also clog up the tip of your transfer pipette. Anesthetise mouse with Avertin, administered intraperitoneally. After administering the anesthetic, put the mouse back into the cage from which it came. The mouse will be more relaxed when placed in a familiar environment and the anesthetic will act more quickly than it would on a distressed mouse. To check that the mouse is fully anesthetised, press or squeeze the pads of the feet. If the mouse can feel this it will try to withdraw its leg from your grasp (Pedal reflex). Do not commence surgery until there is no reflex reaction to this test. The Surgery
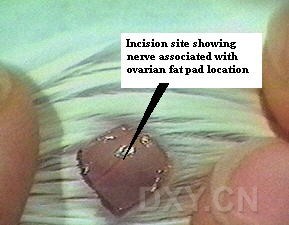
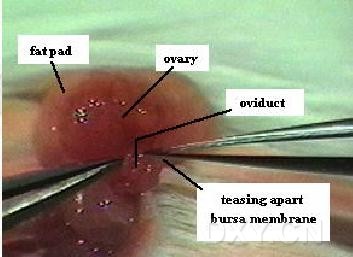
Use the pair of Surecut scissors and one pair of serrated, curved forceps for cutting the skin. The incision should be made approximately 0.5 cm away from the midline and between the natural hump of the back and the point where the rear leg joins the abdomen. Using a (lint-free) tissue dampened with 70% ethanol, carefully wipe the incision site, sweeping away the cut hair. Wipe the scissors with a 70% ethanol dampened tisue to remove any hair. Grasping one side of the incision at a time, carefully introduce the blades of the scissors (while closed) between the inside of the pelt and the body wall for approximately 1 cm. Open and close the blades to clear the connective tissue in this area. Move the skin around until the nerve (a white line, usually seen with associated capillary) can be seen running across the body wall. The light color of the ovarian fat pad can be seen under the body wall in this area. Using a pair of pattern 3c forceps, pinch the body wall and nick to give an incision 0.5 cm across. Reach in with the straight serrated forceps (while holding the body wall with another pair of curved forceps) and grasp the ovarian fat pad, and remove to the exterior where it can be anchored using a serafin clip. Rest the serafin clip across the mouse's back to hold the uterus in place. If the uterus or uterine horn continually slip back into the cavity it may be necessary to gently lie the mouse on the side being careful not to block the airway. The transfer pipette should now be loaded. A minimum of 12 embryos total must be transferred, any less than this and the chances of a pregnancy resulting are severely reduced. Embryos may be implanted in both oviducts or unilaterally. The transfer pipette can be loaded a number of different ways; the following is one popular method. Take up an amount of Hepes buffered medium in the tip of the transfer pipette, then make a small bubble by taking up a little air. Then take up some more medium - roughly the same volume as the air bubble, then another air bubble, same size as before. Then take up about 2-3 cm of buffered media and then a tiny air bubble once more. Take your embryos in the smallest possible volume of medium, lining them up side by side in the transfer pipette. Introduce another tiny air bubble when all the eggs are loaded. Some people use mineral oil instead of or in conjunction with air bubbles for pressure control. This is a perfectly acceptable practice; however care must be taken to avoid introducing mineral oil into the oviducts as this can dramatically reduce litter size by interfering with the ciliary-driven egg transport in this structure, as well as predisposing the animal to uterine infection.
Once the pipette is loaded and the uterus positioned, move the petri dish lid supporting the mouse to the microscope and turn on the overhead light source. Once the lights and focus have been adjusted and the mouse positioned to suit yourself, use the pattern 55 superfine forceps to gently tear open a small hole in the transparent bursa membrane at the point btween the ovary and oviduct where the infundibulum is located. Take care to avoid rupturing the small capillaries that run across the bursa as these will obscure your view of the infundibulum. You may drop some epinephrine on the ovary / oviduct / bursa before tearing the hole to reduce any bleeding that may occur. Once there is a hole of sufficient size to reach the infundibulum, grasp it at the end with one pair of pattern 55 forceps while inserting one blade of the other set into the tube itself. This will ensure that the mouth of the infundibulum will be open and accessible to your transfer pipette. Introduce the transfer pipette into the infundibulum as far as possible (until the tube's natural curve allows no more forward progress without risk of damage) and expel the eggs into the structure, chasing them with the air bubbles used for pressure regulation. These bubbles will prevent the eggs from flowing backwards easily and drive them forward into the ampulla region of the oviduct.
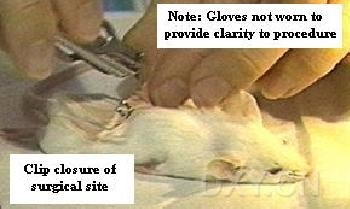
With the transfer complete, the serafin clip can now be removed and the uterus gently eased back into the body. Do not touch the uterus, but ease it back by the edges of the incision in the body wall and allowing the uterus to fall back in, without actually handling it. This procedure is then repeated on the other uterine horn if doing a bilateral transfer. The incision in the body wall is not sutured. The skin is closed with Autoclips - two per incision is usually sufficient. Autoclip wound clips are used on the skin instead of suture as the mice frequently will chew at the suture thread and effectively open their wounds. Once surgery is complete, the mouse is placed in a box of clean autoclaved sawdust. Under anesthetic, mammals are unable to retain heat as effectively as when conscious. For this reason, the mouse should be wrapped in a tissue to help keep it warm. Use of a heating pad or even indirect heat from a slide warmer can be used to care for the animal post-operatively until it regains conciousness. All animals should have recovered sufficiently from anesthetic before being returned to the animal room and left unattended. Recipient mice should be handled with care as pregnant mice become easily stressed, sometimes leading to abortion, or even cannibalism of pups. If all goes well and a pregnancy results, the pups should be born approximately 19-21 days after the transfer, dependent upon strain. |
→如果您认为本词条还有待完善,请 编辑词条
上一篇Blastocyst Transfer 下一篇Microinjection of fertilized oocytes to produce transgenic animals
词条内容仅供参考,如果您需要解决具体问题
(尤其在法律、医学等领域),建议您咨询相关领域专业人士。
0
收藏到: